For the last 5 years, I have been wearing my Suunto 5 nearly 24 hours a day. I invested in the watch after my desert ultra, where I had to switch between watches as there was no where to charge them. Technology is not my strongpoint, meaning I have simple needs when it comes to a GPS watch. My priorities are it being waterproof (for work, although I take it off when I shower), long battery life (I want to charge is less than once a week), different sports modes (my running, indoor cycling, paddle boarding, etc), GPS accuracy (if it’s not on Strava, it doesn’t count!), heart rate (to keep me in the correct zone), and ideally good sleep monitoring.
Suunto watches also have fantastic map features, including bread crumb trails to retrace your steps and the ability to upload maps. I have yet to try either of these as I mostly stick to paved roads when I am out running. #adventurestartshere is Suunto’s motto and my Suunto 5 made it to Antarctica and back. See my Strava profile to look at where I walked and camped on my 7th continent. I also noticed last week that there is also a digital compass and will be trying it out as I prepare for my National Three Peaks challenge and coastal navigation.
The Race was released in the autumn of 2023 and I was lucky enough to be loaned one for the last two months of marathon training before Tokyo. It is a little larger than my Suunto 5 which means it dominates my dainty wrist. Personally, I find the large bright display easy to read when I am running or teaching indoor cycling. On the way to Japan, I could tell who was a runner by the size of their watch and fancy trainers on their feet. I fit right in! The Race display will flash up when you move your wrist which is a helpful way to preserve battery. You can also have a ‘quiet mode’ where the display will not show with movement so it doesn’t wake you up at night. I charge the watch every other week when I am not marathon training. During the last two months before Tokyo Marathon, I had to charge it once a week.
Like the 5, you have to sync your watch to the Suunto app to log your workouts, which can then be automatically uploaded to Strava if your accounts are linked. The Suunto app also allows you to track friends and comment on their workouts. With the Race, I used the Bluetooth connection to receive notifications when out on morning runs before work. This saved me from having to pull my phone out of my running vest every time I heard a notification go off (we use Whatsapp to let each other know if we are running late or first the first person in has a question). You can also receive mobile notifications and adjust your music playlist via the watch.
The alarm feature was very handy in my capsule hotel the last night I was in Japan. We were not allowed to use alarms as to not disturb the other hotel guests. My friend suggested I set my watch to vibration mode and that did the trick.
Just before Easter, I caught a cold that was going around work that lasted 2.5 weeks (which is why this post is so delayed!). I found the Race to be incredibly helpful in justifying whether I should rest or not (it was usually rest). Suunto has their own algorithm for training and recovery: Chronic Training Load, Fatigue Acute Training Load, and Training Stress Score (which is the difference between these two scores). Aside from this, it also counts steps, burned calories, heart rate, sleep, resources. Recovery is monitored by heart rate variability. Sunnto says “If your HRV values consistently fall below your normal range, it is an indication of a compromised recovery state. This could be caused by chronic stress, inadequate sleep, overtraining, or an underlying health condition.” If you wear your watch 24/7, including when you sleep, the available data will be much more accurate and help you maximize your training plans. Looking at FORM (left side of above photo) shows your progress. You can see here that in my 3rd month of marathon training, I began to improve my fitness level (finally!). My Training Stress Score (middle of above photo) gives me the green light to start training while the heart rate variability (right side of photo) indicates that more rest may be needed. Note these screenshots are all from different dates so cannot be used in reference to each other. Hopefully you can see how each piece of data can be applied as an indication of how to proceed with your training.
Last week I discovered that the sleep monitoring is more in depth than I originally thought. It has a visual display on the watch itself of how much sleep is spent in different cycles, deep, REM, and awake. I always threaten to wake James up every time I do but he will probably relate better to a graphical representation. Being perimenopausal, sleep is a challenge. If I drink too much alcohol, I don’t sleep well. Body temperature can also influence my sleep. Being able to track my sleep quantity and quality will be useful in determining what impacts my rest and lead to a positive behavioural change.
Wearing this watch, I can 100% say #AdventureStartsHere. It was so useful while marathon training and then overcoming a cold while training to maintain my fitness for the National Three Peaks challenge which I am completing in late June. I know the mapping and compass features will be essential as I complete some intense day hikes over the next two months. Feel free to join me at Wild Goat Festival at the end of May for hiking, running, and gravel biking, along with talks and music. Use MOLLIEMILLI15 for 15% off your tickets and enjoy the outdoors with me.
Do you prefer to run with a GPS watch or ‘naked’? What data produced by your watch do you refer to most? Let me know in the comments below?
With degrees in science, I am all about the data. My first session with new personal training clients always involved body measurements and baseline fitness assessments. We check in every eight weeks to ensure the program is delivering what the client wants. I also have a handheld device that can measure percent body fat. BMI is not something that I promote to my clients as a way to measure overall health. It is based purely on a calculation that does not take into account how a person is built and how strong they are. I am huge fan of my Sunnto watch which links to Strava, where I log all of my runs, rides, and swims (do you follow me?) to look at how my performance changes over time. You may also recall this previous post where I spoke about a new tool called Supersapiens that helps monitor your blood glucose levels. Every day, there seems to be a new piece of technology to help people learn more about their body and how they can optimize training and nutrition for their goals.
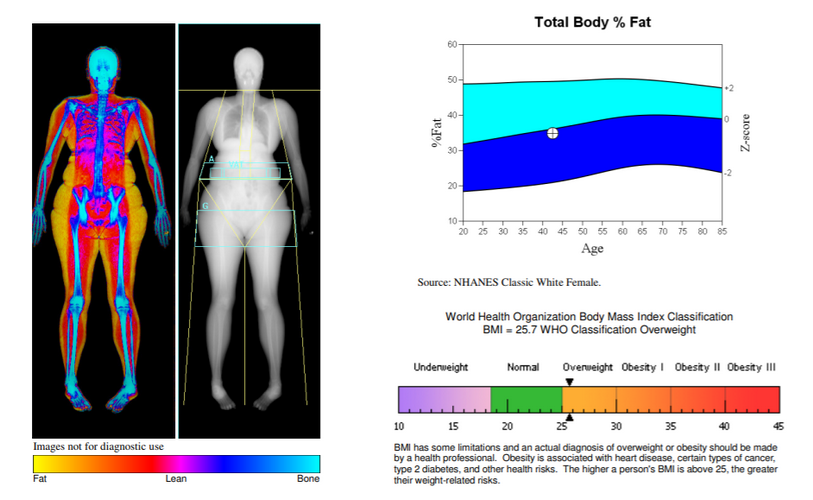
My Vital Metrics is a new London lab that offers clients the options of the following services: DEXA Scan, a 3D body map, body composition scan, resting metabolic rate, and VO2 Max testing. The owner, Owen, is a personal trainer who opened My Vital Metrics to help clients adjust their training focus based on scientific assessments with aesthetic visualizations. The data gathered during your session will help you know your Basal Metabolic Rate (BMR) which influences how many calories you need to consume to gain or loose weight. The 3D body map takes away the human error element when measuring with a tape measure (measuring can be tricky over Zoom especially if your client does not have a tape measure). VO2 Max measures your cardiovascular performance and efficiency while you are going at your maximum on a treadmill or stationary bike.
I was very lucky that Owen invited me to My Vital Metrics to try out his scans and discuss how he can help my coaching clients. He was very easy to talk to and welcomed me into his lab. After chatting for 10 minutes about life in London as ex-pats, I found myself in a sports bra and Runderwear awaiting 360 degree photographs and body scans. Given how I have been feeling about my weight over the last two years, I was a bit nervous about this. Working with a nutritionist in the past, I have many before and after photos in the same outfit but this 3D scan leaves no place to hide. Owen pointed out that when I come back for a new set of 3D measurements, my data will show me precisely how much my measurements have changed (both in measurements and also cross-sections). He offers packages and memberships for regular visits, which is extremely appealing if you have specific goals you are working towards. I feel having an appointment in the diary can be very motivating and will offer greater insight on whether my training and nutrition plan is working for me.
DEXA is the gold standard for body composition analysis, measuring how much body fat and/or muscle you have. For this, I simply had to lay very still as the machine passed over my body a few times. One of the reasons I wanted to get the DEXA scan was to see if visceral fat (the kind of fat that wraps around your internal organs) is the cause of my increasingly annoying incontinence issue. The results below show no visceral fat. I am not sure how I feel about this. On the one hand, it is good news because visceral fat is something that raises the risk for major health complications. On the other, I am very frustrated that I still don’t know why my incontinence has been getting worse over the last year. On a side note, the DEXA revealed just how much stronger my right arm and leg are than my left by measuring the amount of muscle (data not shown).
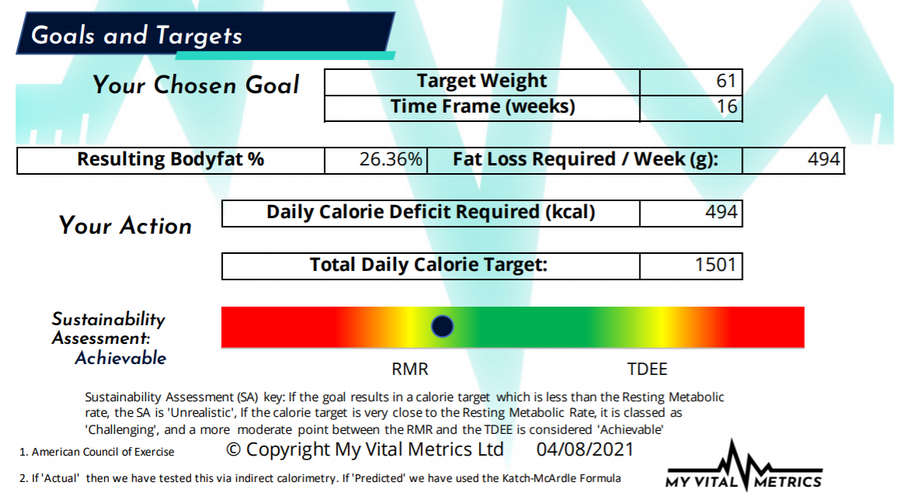
After Owen collected all of the data from my scans, he offered a written action plan on how I can loose weight over 16 weeks, which was our agreed upon goal. Based on my BMR (which was a little high because I had a Red Bull just before my appointment, oops!), I need to aim for 1500 calories for a daily calorie deficit of 494 calories. He set target ideal body fat percentage and an aim to increase my lean body mass. Now I just need to quit my daily cookie diet to see the results. To keep this goal an achievable balance with marathon training, I have decided to wait until after the marathon to worry too much about my diet. Looking at my Strava stats, I spend about seven to eight hours per week on training so that should give me time to meal plan and cook (and hopefully sleep).
Although the scans also identify bone density, this is not a medical diagnostic service. Owen has been able to highlight anomalies for clients to follow up with their GP, which I think is fantastic. Knowledge is power and with the NHS overwhelmed with Covid-caused backlog, these assessments will help you reach health and fitness goals with the possibility that if something major is amiss, it might get picked up. Owen is quite keen to align with personal trainers, nutritionists, and other health practitioners who would find this client data useful. If you think it would be a valuable asset to add to your services, I highly recommend getting in touch with Owen. He has offered my followers who can come to his office in Central London a 20% discount code. It will be a fantastic way to learn about your bone health, muscle mass, and body composition. Send an email to mollie@ptmollie.com to receive the code and let me know what you find out.
Thanks to My Vital Metrics for the complimentary service. All opinions are honest and my own.
I am not the best at life admin. Submitting paperwork, such as receipts for my taxes, invoicing for freelance work, and posting things on eBay, tend to get pushed to the side in favour of a workout or episode of Bridezillas. Actually, the paper gets put into a pile on the kitchen table until my husband forces me to deal with it.
My Simplyhealth UK Active Plan has four different levels of coverage, each with a maximum claim benefit. I have the premium level, which gives me £350 for muscle and joint care, £100 for podiatry treatments, and £350 for health assessments, in addition to other coverage. If I utilize just one benefit a month, the plan pays for itself and I can keep exercising without having to worry about being injured. Because I am so bad at filing paperwork, I was relieved to know that I can either claim with a paper form, which was included in my welcome pack, or submit a claim online. I spend most of my day sitting at a computer so I figured I would be able to handle method on a regular basis.
Booking an appointment
Before booking any appointments, I make sure to read through the T&C’s to ensure my claim will be valid. For example, physiotherapists have to be registered with Health and Care Professions Council (HCPC), as must podiatrists. Then I also considered how much my benefit was and if I thought I would need multiple treatments. For example, my feet aren’t too gnarly so I splurged with my medical pedicure before Wadi Rum. For my osteopath treatments, I went with my current clinic to allow for a continuity of care. For my eye doctor, I went to location that was close to home and affordable.
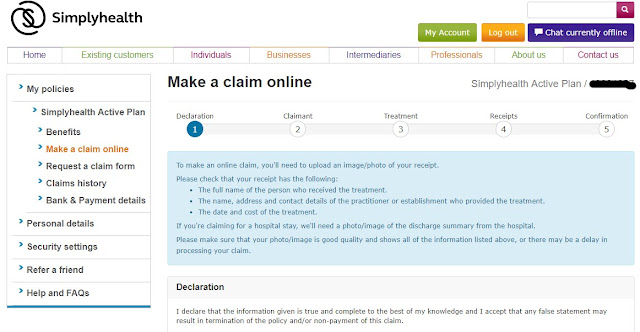
Filing the paperwork For each appointment I have attended so far, I received a paper or electronic invoice. If I received paper, I scanned the document on my printer at work or took a photo. Then I logged into my Simplyhealth account and took the following steps:
On my Simplyhealth account home page, there is a section that says ‘make a claim’. Click on the button to make a claim online, but there is also an option to request a paper form via the post.
On the next screen, you agree to a declaration that the info you are providing is true. It also reminds you that the receipt has to have the following information on it:
The full name of the person who received the treatment.
The name, address and contact details of the practitioner or establishment who provided the treatment.
The date and cost of the treatment.
You specify who the claim is for from a dropdown menu (as you many have partners or children on your policy) and the date of the treatment.
Then specify the type of treatment and cost.
Upload the receipt (either photo or pdf).
Then you confirm all of the details, including bank details.
There is also a screen where you can check your benefit balances, which make it very easy to see if you are using you plan to it’s full potential. My payments are always processed within a few days. I decided to have the money go into my savings account so I could pay for a race abroad at the end of the year (Valencia anyone?).
Thanks to Simplyhealth for sponsoring my 4×4 challenge. All opinions are honest and my own.
December is in full swing and my diary is filling up. With that comes the stress of shopping, working, having the right clothes to wear to holiday parties, trying to schedule in time for the gym, and eating good food to balance out the party fizz. Unfortunately, it doesn’t leave much time for relaxing.
When HoMedics reached out out to me about their new home Stretch mat, I was intrigued. My back is often “locked” (limited mobility, not a muscle spasm) when I see my physio at Function360 (probably from working at a desk and being a runner). He says I need to stretch out more. Because I teach spinning, have started lifting again, and run, that leaves little time for stretching or yoga. The busy holiday season means I have even less time to book a massage (even with Urban who come to your home. Get current offer using my referral code RMOLLI1A). The mat seemed like it was just what I needed to release and decompress without being too technical (technology and I don’t always get along) or taking up a lot of time.
It was so easy to set up. The hardest part was clearing a spot on my floor (we have too many dog beds and shoes). I simply pulled the mat out of the box, plugged it in and turned it on. There are four different settings: flow, stretch, twist and energize. The mat inflates itself during each program which last 7-10 minutes. All you need to do is close your eyes and lay there. There are three levels of intensity that allow people with injuries or pre-existing conditions to modify the stretch to a level that is comfortable to them. Most of the stretches are back extensions which are perfect for those who work at a desk all day or bend over at a counter or cash register. Personally, I would have liked the option for flexion too but understand that this would difficult to achieve laying supine on the ground.
The mat comes with a small pillow you can Velcro on to keep in place. It folds in half and Velcros shut for storage too. It would easily fit under a bed or in the back of the wardrobe when not in use. There is also a handle if you would like to carry the mat with you to and from the car when going on holiday.
I don’t think this mat will cure any long term back pains or conditions, but I do think it will help with relaxation while supplying a gentle massage and some guided mobilizing. In today’s crazy world, we never sit still and just be. This mat will allow you to do that when you have a few minutes at home. This month especially, please make a point to set aside time to relax. You just need 10-15 minutes with the mat and either silence or chilled out music. Leave the phone and any other distractions (pets, children, partners) in the other room. Focus on your breathing and reset your mental state.
I tried to make an unboxing video of myself setting up and using the mat. This one has a bit more info however:
The Stretch mat was provided to me to review. As always, all opinions are honest and my own. The affiliate link costs you, the buyer nothing additional but contributes to the running of this site.
A few weeks ago, dorsaVi got in touch and offered me a chance to have my running form analysed. Having had a gait analysis done before, I was keen to see what this process would offer me in terms of information (and of course, if I am any better at running now after having started corrective exercise training).
The only place in London to offer this service is the Bowskill Clinic near Baker Street/Oxford Street tube station. The team there welcomed me warmly, even though I was a sweaty mess and 10 minutes late (I seriously need a proper compass). I met Rachel and Jon, who kindly brought me up to one of the posh exam rooms and explained the technology to me. In simplest terms, the ViMove2 are two little sensors that are taped to your tibia on each leg.
Rachel taking measurements to ensure the sensors were positioned properly.
This wearable technology monitors your motion and muscle activity in real time. Originally, the clinic used dorsaVi sensors for patients with back injuries. Clients would be sent home with the sensors attached for 24 hours and then return for the data upload and report. The ViMove2, however, is for analyzing knee movements. These can also be worn home for a long period of time but with a short assessment you can still obtain a lot of information.
After my online profile was created and the sensors attached, the testing phase of my appointment lasted about 15 minutes. First, I had to perform squats. Each movement I did three or four times to provide an average score. Next, I had to squat on just my left leg, then just the right. Finally, I had to hop on each foot. We then headed outside for a three minute jog in a nearby park. It was really sunny and warm on the day of my appointment so I got a bit sweaty.
I am taking this test very seriously.
I am happy to say the sensors stayed in place with the adhesive tape used. I could barely notice they were there so I don’t think my running form was comprised at all. By running for at least three minutes, the data collected can look at my running rhythm and stride patterns over time.
Just before my run. I had shorts on, I swear!
After all the info is downloaded to the software, a large report is generated. By taking measurements of the angle off of the centre (your neutral position), it can let you know how symmetrical your legs are, if your legs rotate in or out when you move (which could lead to pain or injury). The tibial inclination (TI) is the maximum angle that the tibia tilt forward while your foot is on the ground. A TI of less than 20 can indicate poor ankle movement and/or reduced leg strength. I am not yet at 20, but pretty close. My right Achilles was bothering me this day, to the point that even Jon noticed the difference in my left and right leg jumps just by observing how high I jumped.
Valgus and varus details for each test
Overall, my angles (varus and valgus) are a bit more extreme that the average person. Anything grater than +10 or -10 indicates a higher risk of injury. I am symmetrical however, so both legs move in similar patterns.
Information is also shown in 2D. This is for two repetitions of a squat.
The data collected during the run also tells you your ground contact time, initial peak acceleration, and ground force reaction. Using this info, along with other baseline tests, sports therapists and trainers can develop a training program to correct any issues. At a later date, you can then re-test and see if there have been improvements. Here is some of my data:
Ground contact time was high, indicating low cadence and possible fatigue.
Initial peak acceleration was average.
Ground force reaction was very low, which may indicate run efficiency.
My cadence was 173/min at a 12 km/hour pace.
Data from my three minute run
As a biologist-by-training, I much prefer data-driven evidence. It makes more sense to me and can be confidently monitored over time. Even having something as simple as photographs or videos of your form can be a powerful tool. I look forward to seeing how wearable technology makes it easier for athletes, either professionals or amateurs, to improve their performance. The ViMove2 was a very simple physical performance-based test, non-invasive, and provided a lot of information. If you are looking to improve your run form, see how your body moves in different kit (such as shoes), or want to learn more about how your body moves, I highly recommend finding a local provider who offers ViMove2 sessions.
Thanks to the Bowskill Clinic and dorsiVi for the complimentary experience in trying out this movement monitoring system. All opinions are honest and my own. The crappy running form too.
This website uses cookies to improve your experience. We'll assume you're ok with this, but you can opt-out if you wish. Cookie settingsACCEPT
Privacy & Cookies
Privacy Overview
This website uses cookies to improve your experience while you navigate through the website. Out of these cookies, the cookies that are categorized as necessary are stored on your browser as they are essential for the working of basic functionalities of the website. We also use third-party cookies that help us analyze and understand how you use this website. These cookies will be stored in your browser only with your consent. You also have the option to opt-out of these cookies. But opting out of some of these cookies may have an effect on your browsing experience.
Necessary cookies are absolutely essential for the website to function properly. This category only includes cookies that ensures basic functionalities and security features of the website. These cookies do not store any personal information.
Any cookies that may not be particularly necessary for the website to function and is used specifically to collect user personal data via analytics, ads, other embedded contents are termed as non-necessary cookies. It is mandatory to procure user consent prior to running these cookies on your website.


Recent Comments