
by Mollie Millington | Jul 1, 2020 | product review, recipe
When you buy your groceries, do you consider the environmental impacts of what you put in your trolley? One of the reasons my husband stopped eating meat was because of the environmental impacts. It takes a lot of water and petrol to produce beef (in addition to the methane release). I was a vegetarian until I was about 33, when I tried the Whole30 to quit sugar and reduce inflammation due to lactose and wheat consumption (haha, yeah right). Prior to this, not having meat in the house wasn’t a problem, but now I eat meat on a daily basis. I figured I have 30 years of vegetarian credit built up and I rarely eat beef nowadays. I am always keen though to try out new protein products, especially if they taste like chocolate.

A friend of mine, who I met in Jordan during the Wadi Rum Ultra, recently introduced me to BioBug. It is 100% Acheta domestica grasshoppers that are ground up into a powder. Produced in Indonesia, Biobug claims to the much more sustainable when compared against beef production:
- Cricket production use 95x less land than beef production
- Cricket powder provides 69g protein/100g vs 40g/100g premium beef
- Crickets use 2000x less water to provide the same yield of protein
- Crickets emit 375x less green house gasses (so do they fart?)
But how does it taste?
James and I both tried adding Biobug to our breakfast. James shook some into his overnight oats while I added 5g to 40g porridge and 10g chia seeds with hot water. It tasted a bit dry and earthy for me, so I added a sprinkle of cinnamon, which helped improve the taste. James adds approximately twice as much (double dash he says) maple syrup to his overnight oats than normal when he adds Biobug to mask the earthy taste (he tends to prefer savoury tastes while I like sweet). I also wanted to try baking with it, so I turned to my favourite banana bread recipe and replaced 25% of the flour with Biobug, as the company suggests. I also added a bit more cinnamon and vanilla extract to keep the bread sweet.

Better Homes and Gardens banana bread with Biobug

1/3 cup Biobug cricket powder
1 1/4 cups flour
1 1/2 teaspoons baking powder
1/4 teaspoon baking soda
1/2 teaspoon cinnamon
1/8 teaspoon salt
1 egg
3 bananas (I freeze brown bananas to used in banana bread. You need to thaw first)
3/4 cup sugar
1/4 cup vegetable oil
1 teaspoon vanilla extract (optional)
1 teaspoon lemon juice

- Grease bottom and sides of a loaf pan and set aside.
- Preheat oven to 180 degrees C.
- Mix Biobug, flour, baking powder, baking soda, cinnamon and salt together in a medium bowl and set aside.
- Combine egg, bananas, sugar, vegetable oil, vanilla and lemon juice together.
- Fold in dry ingredients. You can also add 1/4 cup of chopped walnuts, chocolate chips, or fresh blueberries if you want to jazz up your bread a bit.
- Spoon batter into prepared pan and cook for 50-55 minutes. I usually start with 30 minutes and test with a cake tester (long metal stick as a toothpick substitute). If the top starts to brown before the cake is baked, you can put foil on the top.
- Let cool for 5-10 minutes before flipping out of the pan.

For this experiment, I split the batter to make two mini-loaves in case the end result wasn’t great. To one of the loaves, I added in 1/4 cup chocolate chips. We found the bread was darker than usual and it tasted very similar to the original recipe. It was just as moist (I was worried the cricket powder would dry out the batter) and even without chocolate chips was good (guess which loaf we finished first). I think the vanilla extract might not be necessary so have made that optional above. Next, I am going to make Snickerdoodle cookies with Biobug as those cookies have lots of spices which will also mask the Biobug earthy taste.

If you have any other recipe suggestions for which I should try adding Biobug (basically anything with flour), please leave a comment below and let me know.
Please excuse my horrible photos. We were mid-DIY project in the kitchen. Turns out, that is not the best time to take photos for your blog!

by Mollie Millington | May 13, 2020 | eating, happiness, recipe, self care
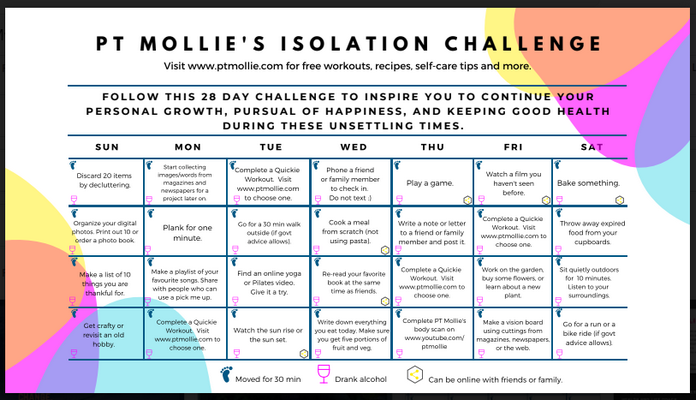
How has self-isolation been treating you? Whether your government calls it lockdown, sheltering-in-place or something else, you are probably home more than you are used to. If you follow me on social media, you might have seen my link for a 28 day self-isolation challenge. It offer something relatively simple to do each day. It could be trying something new, cooking, completing a workout or connecting with a friend. The calendar also allows you to track what days you drink and how often you are active. Although I shared it in April, there is no reason why you can’t start today if you missed it.
We switch to a different format for May. I have a few bingo cards for you to try out. Since watching The Phantom of the Opera on YouTube, I have been addicted to AccuRadio’s mutiple Broadway musical channels. This has inspired me to create classic and modern musicals bingo cards (there are two different sets for each category for a total of 96 shows). You can either listen to the soundtrack or watch the film of the musical in a square to cross the square out. Click here to download them as one file.

Musicals aren’t for everybody, but I believe chocolate is, so I asked my good friend, Katie from Cake vs. Scales, to create a chocolate lovers bingo board. She went above and beyond by thinking up two chocolate heavy themes. Please remember if you have any food allergies or intolerance to please check all ingredients before consuming our suggested treats.

First up is a Baking Desserts Bingo. Katie put together 20 of her favourite dessert recipes (many from her own website) and I added a few more that I love (such as my cookie dough guilty pleasure and Guinness cupcakes with whiskey ganache). You can download 30 different boards here and then the recipe links can be found here. This is a good one to challenge friends and family to. Book in a night baking together and see who has the best presentation. Take photos and tag us on Instagram (@ptmollie and @cakevsscales) so we see what you get up to.

The other bingo challenge Katie developed for me was with different types of chocolate bars. Many are only available in the UK, so I in addition to the UK chocolate bar bingo game, I also created a US candy bar version for my readers in the States (aka my mom).

If chocolate or musicals don’t make you happy, why not create your own bingo game? There are lots of websites that allow you to create unique boards. You can use films, TV shows, breakfast foods, chores, homework assignments, whatever you fancy really, to generate 30 different cards. Then you can play against friends and family. Our bingo cards are meant to spark some joy but I know these specific ones will not appeal to everyone. There is nothing stopping you from making your own fun with a little bit of creativity and bingo.
Leave a comment below and let me know which card you tried and how you did.

by Mollie Millington | Mar 13, 2020 | recipe
This lasagna recipe is adapted from the The Better Homes and Gardens New Cookbook Spinach Lasagna. This is also where my recipe for banana bread is from.
I love veg so we throw a little more in. You can estimate the vegetable portions or invest in measuring cups. Feel free to alter the recipe with veg you enjoy. I don’t know the nutritional value, but it will count for at least 1 of you 5 servings of fruit and veg.

Ingredients
- 9 uncooked lasagna noodles (I usually make 12 in case some rip or get stuck together)
- 1 cup chopped large onion
- 1 cup sliced fresh mushrooms (optional)
- 4 cloves garlic, minced
- 2 tablespoons margarine or butter
- 1 bell pepper (any color)
- Head of broccoli (optional)
- 1 cup chopped carrots (optional)
- 1 (10-ounce) package frozen chopped spinach, thawed and squeezed dry or bag of fresh spinach sauteed
- 2 (15-ounce) container ricotta cheese (note you can add in 1/2 brick of firm tofu as the consistency will match the ricotta and add protein)
- 1 cup shredded mozzarella cheese
- 1/2 cup grated Parmesan or Romano cheese
- 2 eggs, beaten
- 1 teaspoon dried basil
- 1/2 teaspoon dried oregano
- 1/4 teaspoon pepper
- 1 (30 1/2-ounce) jar spaghetti sauce (meatless, if desired) (We end up using 1 1/2 jars)
- 1/4 cup grated Parmesan or Romano cheese to put on top (optional)
Directions
- Preheat oven to 375 degrees F (180 degrees C). Spray 9×13″ pan with butter or oil to prevent food sticking.
- Cook lasagna noodles 10-12 minutes, or until tender but still slightly firm. I suggest adding some olive oil to boiling water to prevent the noodles from sticking together. I also add one noodle at a time at the start and ensure they are not sticking together. If you want to use no-cook noodles, you may need to cook the lasagna longer. When done, drain the noodles and rinse with cold water to prevent sticking after draining. You may need to peel noodles apart to ensure all surfaces are rinsed. This step is very important!
- Meanwhile, in a large skillet, cook onion, peppers, mushrooms and garlic in hot margarine until tender but not browned. Set aside.
- Steam broccoli and carrots until they reach desired texture. Some people like a crunch, some don’t.
- Pat frozen spinach dry with paper towels in a colander (use lots of paper towels as the water will make the lasagna watery). Or saute fresh spinach in same skillet as onions and peppers.
- In a medium bowl, stir together spinach, ricotta, tofu, mozzarella, 1/2 cup of the Parmesan, the eggs, basil, oregano and pepper. Stir rest of the veg (onions and steamed veg) into spinach mixture.
- Spread 1/2 cup of the spaghetti sauce evenly in the rectangular baking dish. Arrange three lasagna noodles on top of the sauce. I like to add a little more sauce to the top of the noodles before adding the ricotta layer.
- Layer with half the veg/spinach mixture, another layer of noodles and then one cup of the spaghetti sauce. Repeat layers, ending with noodles. Spoon remaining sauce over the top. Any noodles on to player that do NOT have sauce on them will become crunchy and tough. Try to cover everything.
- Sprinkle with the 1/4 cup Parmesan and more shredded cheese (optional).
- Bake, covered with foil or lid, for 20 minutes. Uncover and bake about 10 minutes more, or until heated through.
- Let stand 10 minutes before serving to let the lasagna set so it will hold its shape better when cut. Makes 8 servings.
- Great to re-heat or freeze.

Some photos to help you visualize the steps
Sauteed fresh spinach (remember is really reduces to nothing. Buy an extra bag just in case).

Veggies and cheese

Bottom layer of sauce and noodles

Veg and cheese middle layer

Ready for the oven…. and then I was so hungry, I forgot to photograph the final result. Please refer back to the cover photo. 🙂

Look at all that delicious-ness!
This post includes affiliate links. These cost the buyer noting additional and help maintain the running of this site.

by Mollie Millington | Mar 5, 2020 | recipe

Here is another favorite recipe of mine. I have based it on the Better Homes and Garden’s banana bread recipe. I added course bran and substituted the sugar for natural sweeteners (agave nectar or honey) to make it a bit healthier. You could also use apple sauce instead of oil, but this might change the texture and/or baking time. Sometimes, I make two small loaves. We wrap one up and freeze for a later date when I don’t feel like baking.
If you would like to use measuring cups, pick some up on Amazon here.
Ingredients
- 1 ½ cups/ 215g whole wheat (whole meal) flour
- ¼ cup/ 15g course bran
- 1 ½ teaspoons/ 7g baking powder
- ¼ teaspoon/ 2g baking soda
- 1/8 teaspoon salt
- ¼ teaspoon cinnamon
- 1 egg
- 3 mashed medium-sized bananas (freeze fresh or brown ones for perfect mushiness)
- ½ cup/ 125ml agave nectar or honey
- 1/8 cup/ 30ml canola oil
- ½ cup chopped nuts, blueberries, or chocolate chips (optional)
1. Preheat oven to 350°F (~175°C).
2. Grease bottom and sides of 9 x 5 x 3 inch loaf pan or two 7.5 x 3.5 x 2 inch loaf pans (links below to buy).

3. Mix flour, baking powder, baking soda, salt, and cinnamon together in a large bowl. Push to the sides of bowl leaving a space in the middle.
4. Mash bananas in a medium bowl.

5. Mix in egg, agave nectar/honey and oil.
6. Add wet mixture into dry bowl. Stir until flour is just moistened. It will be lumpy- don’t worry!
7. Fold in nuts, blueberries, chocolate chips or anything else you fancy.

8. Bake for 55-50 min for 9 x 5 x 3 inch (2 pound) loaf pan or 40-45 minutes for 7.5 x 3.5 x 2 inch (1 pound) loaf pan. Note that the less oil, the less time it will take to cook. If your batter is thick when you put it in the pan, you may need to cook for less time.
9. It is cooked fully when you insert a toothpick and it comes out clean (no mixture on it).
10. Cool for 10 minutes in pan.
11. Remove from pan and continue to cool.
12. Enjoy!

This post contains affiliate links which costs you nothing extra and help maintain the running of this site.

by Mollie Millington | Feb 20, 2020 | recipe
Smoothies are an easy, satisfying snack we have frequently in my house. In the summer, we serve ’em up (with a little whey protein thrown in) after workouts. Today I made them because I saw one at the mall and developed a craving. Since making my own, I never order them while out. I can taste the difference with the sugary, syrupy mix. Here is how I make them.

You will need: frozen banana (freeze your brown bananas for fresh banana bread or smoothies rather than throwing them away. My banana bread recipe will be up soon!), frozen berries (you can get mixes in the freezer section of your local grocery store rather than buy fresh), low-fat yogurt, orange juice, honey or agave nectar, and a blender.

1. Leave the frozen banana out on the counter for a few minutes to thaw slightly. By using frozen fruit, you won’t need to add ice.
2. Add 1/2 cup of low-fat yogurt (any flavor you like) and 1/2 cup of frozen berries (can be any fruit, even avocado, kale or spinach) to the blender.
3. Cut banana into smaller chunks and add to the blender.
4. Add a splash of orange juice. The more juice you add, the thinner the smoothie will be.

5. If using plain yogurt, I like to add honey or agave nectar as a natural sweetener. Vanilla extract works too.
6. You can also add flaxseed, linseed, chia seeds, protein powder, or other supplements for additional nutritional value.
7. Blend. You may need to stir the mix with a spatula if an air pocket develops in the bottom of the blender.
8. Serve.

Of course, you should experiment with fruit, yogurt, and juice flavors to find a combination you like. As smoothies break up the food for you, take your time to enjoy it. It will be easier to digest that eating the food whole which means your body will take less time to digest it. It may give you a temporary sugar spike that you are not expecting.
Let me know in the comments below what smoothie ingredients are your favorite.

by thinkmarsh | Dec 31, 2018 | product review, recipe
Saving the Earth was a big concern of mine growing up. I wanted to recycle everything and always turned the lights off. ’50 Simple Things You Can Do To Save the Earth’ was a favourite book of mine. Much to my mother’s dismay, I even brought backing recycling from my university to home (a 6 hour drive away. I also brought a lot of laundry).
Reducing my impact on earth and it’s resources has continued to be important thread in my life. I have carried a reusable water bottle since uni and try to cycle or carpool when I can. Living with a Brit, I even got in the habit of hanging our laundry out to dry in the summer time in Michigan (we have no choice now as very few people in the UK have a dryer).
When I saw the opportunity to review the Wonderbag,I was intrigued. Firstly, because it can heat the pot for up to eight hours without electricity and secondly because it helps to empower women in third world countries. I was pretty much sold on both of those factors but want d to try it out myself.
|
| Wonderbag in action |
The Wonderbag was developed by Sarah Collins with inspiration from her childhood in South Africa. Frequent blackouts meant her family would use couch cushions to keep meals warm. Years later, Collins invented the Wonderbag. Its foam stuffing allows food brought on a boil by conventional means to continue to cook for for up to 12 hours. The impact of this means women spend less time foraging for firewood and less time cooking over open flames. The smoke from these flames can be toxic and severely impact their heath.
We don’t have room for a slow cooker (or “Crock Pot” as we call it in the USA) because we have a small flat. My husband loves to cook anything that requires only one pot, so he is missing out on a lot of cooking opportunities. We have a few batch cooking staples, such as veggie chili and a chicken dish from Well Fed 2. I figured since I was trying out the Wonderbag, I might as well try out a new recipe and share it with out with you.
 |
| Not sure this is going to fit. |
After looking on the internet for inspiration, I decided on a slow cooked pork with Italian seasoning. We don’t really eat ham or pork and thought it would be a nice change from chicken. I bought the smallest pork roast I could find at the shop and got to work.
 |
| Seasoning and garlic. This will be yummy! |
I made three mistakes when preparing this meal. First, my pork roast was too big for the pot, which meant the lid did not seal all the way. This affected how long the food needed to cook for on the stove top and how involved I needed to be. Second, the only pot that the roast fit in and itself fit in the Wonderbag had a handle on it. This will affect the efficiency the Wonderbag insulation has. I firmly believe that these two errors impacted my cooking experience.
To prepare the pork, I dried it off with a paper towel and then tried to slice the top in several places to create pockets for sliced garlic. My roast was about two kilos and I used three large garlic cloves.
 |
| Roast prepped with seasoning |
My seasoning was one teaspoon of dried basil, oregano and thyme mixed with half teaspoon salt and half teaspoon pepper. I mixed this combo in a small bowl and then rubbed all over the pork. You can use any seasoning combination you like to create flavour you will enjoy.
 |
| Lid ajar means the cooking is less efficient. |
Once seasoned, I put the entire roast into a saucepan with lid and cooked for 20 minutes on medium heat. As I saw the lid was slightly ajar, I decided to cook it for another 20 minutes. The Wonderbag recommends having a meat thermometer handy to see if meat is heated through. This was my third mistake because we don’t have one.
 |
| Tea towels lining the Wonderbag |
After 40 minutes on the stove top, I put the pot in the Wonderbag, which I had lined with a few towels to avoid the inside of the bag from melting. I weighed the lid down with a kilo of salt to hopefully keep the heat in. Then I took the dog out for a walk. Two hours later, I checked the pot and it was still warm so I left it for another hour. After that, I took the meat out and cut it down the middle with a bread knife. The inside was still a bit pink (again, no meat thermometer), so I returned the roast to the pot and cooked for another 20 minutes, holding the lid down for the last ten minutes (the lid still wouldn’t close).
 |
| Nearly cooked all the way through. |
By this point, the inside looked cooked, so I sliced myself a piece and left the rest in the pot with lid on and heat source off. Once I finished my dinner (it was super yummy!), I carved up the rest. Half went into the fridge and half into the freezer. I decanted the juice from the pot into a small Tupperware to use as gravy. There wasn’t much though. My husband used it all for one serving (I didn’t mind as I am not a fan of gravy). If you like gravy, you might want to make some additional gravy.
 |
| It was delicious! |
A week later, we defrosted the frozen pieces. They looked pink when frozen but were grey by the time they were room temperature. Overall I am pleased with how my experiment went given I was missing several keys items (a pot without handle and a meat thermometer). I am definitely going to get a proper pot for using the Wonderbag but am not sure if a meat thermometer will get much use. The Wonderbag will be perfect for making chili and stews this winter, and maybe even mulled for long winter walks and when we host a big dinner party (when we get a bigger flat).
If you have any ideas on what we should cook with the Wonderbag next, please let me know in the comments below.
 |
| Served with a side of sweet potato. |
Thanks to Wonderbag for the complimentary bag to put to the test. All opinions are honest and my own. Please note that this post includes affiliate links which cost the buyer nothing additional but help support the running of this site..


Recent Comments