
by Mollie Millington | May 11, 2018 | family, product review, ski
I’ll admit I am pretty lucky to have spent many weekends at a local ski resort in Western New York with one chair lift. My dad was on ski patrol which meant we were able to afford as much time on the slopes as homework and extracurricular activities would allow. When I moved to Boston for university, it was so hard not being able to easily access good skiing. I always had my skis with me just in case there was a bus trip to Maine, Vermont or New Hampshire. The mountains of New England were nothing like the glacial hills of New York and much farther away. Eventually, I made it out west to Colorado, Utah, Wyoming, and British Columbia. As I travelled more, I soon came to realise that my skis and ability were better suited to icy slopes rather than knee deep powder. I just haven’t learned how to ski in fresh pow yet! When we lived in Michigan, we got season tickets to Caberfae Peaks, which was nearly a two hour drive on snowy roads in my Subaru. But once we got there, I was overcome with general ennui. Sure there were several chair lifts, but the runs were short compared to the Rocky Mountains. I didn’t care which slope we skied down as they were all nearly the same and over in a swift second.
Since moving to England, I have once again been jonesing for some snow. When we get a centimetre of snowfall in London, the city shuts down. I have heard there is skiing up in Scotland but I haven’t made it up there yet. Our good friends have a chalet near Verbier, Switzerland which we have been lucky enough to visit three times over the years. Many of the gang are school teachers or university lecturers which makes coordinating holiday dates tough. In addition, many children have now joined our tribe which meant we had to rent an additional chalet this year.
Because we rarely go skiing and have a small flat, my skis ended up in the shed for a few years. A week before we were due to go to Verbier this February, we pulled them out to find the skis were rusty and the bag covered in mould (God, how I loathe British weather!). My skis were a graduation gift for uni, so they are pretty old anyways but I was simply devastated to see them in that state. Luckily, I knew Decathlon had a ski shop so I quickly booked them in for a wax, sharpen and tune up. We also took my husband’s snowboard in for a wax (although his board is stored under the bed and was in much better shape).

The process was pretty simple. We called the Decathlon workshop, which also cares for bikes, and booked in our kit. I think they have limited ski/snowboard staff or did that week because it was a few days before we needed to drop off our kit. Due to our schedules, we asked if we could drop the kit off early and they said it wasn’t a problem. I picked the skis and board up a day before we were due to travel and they were transformed. I felt such relief. I also picked up a new ski bag while I was at the shop. My old one was plain black canvas (also wet and gross) but the Decathlon one is a bright blue, has a light waterproof lining and wheels on one end. It was so much easier to travel with. I always stuff my ski gear around for skis for protection and will with this bag too as there isn’t much padding.
 |
| Ready to board |
I thought this trip to Verbier would be the end of my skiing days for 2018, but I was wrong. Snozone is an indoor snowsport facility with three locations in the UK- Milton Keynes and Castleford both have artificial snow, while Skizone in Basingstoke and Castleford have a revolving astroturf carpet. A few weekends ago, they had a big event for their SOS (Summer of Snow). The day I went to Milton Keynes, it was over 20 degrees C outside. After walking 30 minutes from the train station to the facility, being indoors was a nice treat. Snozone Milton Keynes has equipment hire, a soft play zone for the kids, café and bar, large lounge with televisions, and of course, lots of real snow!
 |
| Cafe at Snozone Milton Keynes |
My visit started off with 45 minutes of sledging (or sledding as we call it in America). The group meets at the appointed time and are escorted to the bottom of the sledging slope by a member of the Snozone team. All kids under 12 must wear helmets and are available to anyone else who wants to wear one. I was the lone adult as it was families who had booked in. The sledge is a one-seater with a stick you put between your legs, like a horn on a horseback riding saddle. You have to walk up the hillw(hich is half of the indoor slope) and then use your hands to steer the sledge right or left. To brake, you have to dig your heels into the snow. I wasn’t keen on this because snow kept going up my snow pants and I wanted to keep my socks dry for skiing later in the day. I know for next time though to bring a change of leggings and socks. I can’t remember the last time I went sledging, so it was a lot of fun to let loose for a bit and enjoy the snow.
 |
| At the top of the slope |
My next activity was skiing. I was given a one hour timeslot with my slope pass, which included equipment hire, for just £30. The slope pass prices vary depending on day of the week, school holidays, and how long a session you want. Currently, an eight hour weekend adult pass is £37.49. For £10 more, you can hire ski clothes such as a ski jacket or snow pants. I was amazed at how affordable this is compared to ski resorts in Switzerland or USA. There are memberships available too if you live nearby and think you’d like to get practice in over the summer. My husband has been threatening to learn to ski for years and I am tempted to learn to snowboard. Taking lessons at Snozone seems much more economical that hiring kit, paying for lessons, and also purchasing a lift ticket in Switzerland. Plus, if we didn’t like it as much as we thought we would, we could just go home. Or sledging.
 |
| Always wear a helmet |
The memberships offer additional discounts too slope off of slope sessions, café and shop purchases, children’s parties, private lessons, and tune ups in their ski shop. Crystal Ski has a desk in the Milton Keynes location where you can book a ski holiday and receive additional benefits as a member too. I could see Snozone as an alternative stag, or hen-do for people who want something fun but doesn’t break the bank. The other thing that I think is pretty cool about Snozone is that they offer Disability Snowsports training. Anyone with a sensory, cognitive, or physical impairment can come learn to ski or snowboard. Their aim is to make snowsports inclusive and accessible for all. That is something I can 100% get behind.
If you are used to the Rocky Mountains or Alps, Snozone will probably seem a bit small to you. There is really only one run, but there are jumps and slide rails on which you can gain confidence for your tricks. Or, as I suggested above, you can learn a new snowsport for your next holiday. Everything you need, including lockers and showers, are available to you at the Milton Keynes location. If you have a free day, I recommend checking it out. I think I am going to organize a fitness blogger meet up there this summer because that group is always up to try something new. Snowsports are a great fitness activity, burning lots of calories and working your core and cardiovascular system too.
Do you know how to ski or snowboard? Did you take lessons when you were little or are you a natural in the snow?
Thanks to Decathlon for coming to my rescue by offering complimentary ski shop service and providing my new ski bag with such short notice. All views and opinions are own. Even though I am a member of the Decathlon Blogger’s Community, I can honestly say I love their affordable kit and ethos of #sportforall.
Thanks for Snozone for the complimentary visit to their Milton Keynes slope. All opinions and wipe outs are honest and my own.

by Mollie Millington | May 8, 2018 | Kilimanjaro, outdoors, product review
Packing for Kilimanjaro was a process that took months. I did tons of research, checking packing lists by various trekking company’s suggestions, reading books, and talking to other people who have experienced Kilimanjaro. Of course, there was about one million things I needed to back into a 90L duffle bag so I thought I would let you know the things that I found useful to have. The girls on my trip also had a few tips on what they found useful.
If you think you will only use an item for this trip, your tour operator should be able to arrange hiring (renting) certain things. Be sure to ask the price before you get the item and keep in mind that what you hire may not be to your Western standard. It will probably be something that a toursit left or sold after their trip.
Essentials to pack
I used Osprey Eja 38*, a lightweight rucksack designed for a woman’s body. It was a little big for day-to-day climbing but perfect as a carry on as I needed to have all my essentials in case my bags got lost on the plane (two of the six in my group had luggage problems). The essential features were water pouch compatible, pockets on lid flap for storing things, hip and chest straps, and it only weight 1.13kg. It also had straps on outside to hold my walking sticks while climbing Baronco Wall. I also got an Osprey rain cover* kept my stuff dry. The only pockets were in the lid, which meant that I needed Osprey Ultralight Packing Cubes* to keep organised. I had one for my electronics, one for snacks, and another for toiletries. I t would have been helpful if each cube was a different color to make it easier to pull out of the Eja in a hurry. As an alternative, I tied a piece of colored ribbon on the zipper, which helped a bit.
My Camelpack pouch was essential. Having the tube and mouthpiece made it so much easier to drink on the go. I would say the thermal control kit is important too (although my tube froze on summit night anyways), along with a cap that keeps dirt out of the bite valve.
Hiking boots were a big concern for me. With Achilles tendinitis, I am very picky about what I wear on my feet. Salomon Quest 4D 3 GTX hiking boots* were something I knew I would need to keep my feet warm and dry. With heel lifts and loose laces, I was able to manage minimal Achilles pain. I only wore the Quest boots on summit day. The rest of the time, I wore my Salomon Womens Escambia GTX trail shoes which are a few seasons old. At times they were a little slippery but they kept my feet dry. Before I left, I treated them with Nikwax waterproofing to ensure my feet would stay dry.
Water purifying tablets were something I didn’t bring, but luckily someone else did. Although Eco-Climbing Africa’s team boil the water, my stomach was still funny. I have a pretty sensitive stomach no matter where in the world I am and some people experience problems at altitude too. Purifying tablets are light and inexpensive, so I say have them on hand just in case you or someone else needs them.
Gaitors and hiking poles were the two things that were on every list. The ones I used were Decathlon’s Forclaz 50*. I worn them every day and never got snow or rocks in my low top shoes. You can wear with shorts or long pants. And they were really helpful at keeping my long pants clean for inside tent too.
 |
| Wearing my gaitors to keep the snow out of my shoes. I am also trying not to fall too. The snow was very slippery. |
As I just mentioned, adjustable hiking poles were the other key item to pack. A friend lent me their old Leki poles, similar to the Sherpa XL V. The adjustable heights are key as many days there is a gradient to manage, both up and down. By adjusting the height of the sticks, it makes ascending and descending much easier. Our guides were really good at setting the poles to the correct height.
Head torch is probably number three on my list. When we got back to camp, my head torch went straight into my pocket. Climbing in March meant early nights. After dinner, it would be pitch black.out and therefore hard to get back to our tents. The camp sites are uneven, full of rocks, and have tent poles and ropes everywhere. It would be a shame to get injured walking from one tent to another rather than make it to the top. Unilite sent me a Sport H1 head torch* to try. It offers 175 lumens, with 70m beam distance, red light, and various flashing patterns. We put fresh batteries in all of our head toches just before we started climbing to the summit and it lasted the rest of the trip.

I went to Kilimanjaro in March, which is close to the start of rainy season. My 25 liter dry bag was a bit of an overkill but a 5-10 liter bag for electronics and socks is a good idea. My duffel bag was a 90 liter dry bag too but the porters put it in another bag when they carried it. Their exterior bag was a bit worn through but this may depend on the company you travel with. Wet clean clothes and damp sleeping bags would really damper the trip, so try to find something that can resist some rain.
Hand sanitizer is a no brainer. There isn’t any water to wash your hands 95% of the time. Be prepared.
In addition to your Camelback, bring a water bottle that doesn’t leak to act as a hot water bottle. I mistakenly brought my Hydroflask, which is so well insulated that it didn’t keep me or my sleeping bag warm overnight. My tentmate was a godsend and lent me a plastic bottle to use at night. I owe her big time.
Every day, no matter how cloudy it was outside my tent, I put on sunscreen as we were very close to the equator. Don’t forget to apply it to your ears (I burned mine).
Pack several pairs of gloves in several different thicknesses. They will get wet so it is good to have a few alternatives. Although porters may not have gloves, I would suggest keeping your’s until the end of the trip. At the end of the trip, you can give any unwanted kit to the Kilimanjaro Porter’s Assistance Project. I picked up a few inexpensive pairs of gloves at Decathlon in the snow sports section that were great.
No matter what time of year, I would say a raincoat is an absolute must. Climbing to the top of Kili takes you through several exosystems. The weather on the mountain changes rapidly and you would hate to be caught out in a storm. I found a raincoat more helpful than the poncho got off Amazon because my poncho was long and I kept tripping on it while I was climbing. Look for a jacket with pit zips to help regulate your body temperature. I have needed a new raincoat for a while, so bought a Forclaz 400 from Decathlon. I bought a size bigger to allow for layering on the mountain.
Wet wipes are handy for a quick “shower” in the tent. Just be sure to get biodegradable ones and remember to pack some spare bags for your rubbish. Everything you carry into the parks, you have to carry out.. I didn’t use wipes much (other than armpits every morning) but my camp mates said they are a must.
Quick dry towel is really handy washing your face and hands at camp. You don’t have much time to leave it out to dry so a small size is the way to go. I packed my Life Adventure towel, which is also treated with Polygiene to reduce the smell between washes.
Your phone won’t be able to charge as there isn’t any electricity on the mountain, nor can it capture the beauty of the surrounding landscape. I brought my G-Eye900* active camera from Decathlon and meant to pack a small point and shoot but forgot it in the rush to get to the airport. You will need to consider the size and weight of the camera you pack. If you have a choice, invest in a camera that is drop proof and water proof. Or if you borrow one, learn how to use it before the trip.
I wore a scarf around my neck the while trip to help wipe sweat and snot away. Alice, from Alice’s Adventures on Earth, made us all of us some really cool ones with the trip logo on them. I also slept in my lighter Buff polar balaclava because I was so cold. My friend, Victoria, borrowed one of my balaclavas on summit day to stay warm. I started off with the Cross Tech buff but quickly took it off because I got warm.
This wasn’t on my essentials list, but everyone else in my group said handwarmers! I packed small ones that you can use while skiing while the girls brought body warmers. Mine didn’t keep me very warm but the others stuck them to their shirts during the day.
Optional
It rained so much that I couldn’t wear my Nabaiji pool clogs* at camp for fear of my feet getting wet. In addition, because I didn’t wear proper hiking boots on a daily basis, my feet weren’t too sore, tired, or heavy. The others in my group had camp shoes they wore in the evenings so you might want to pack a pair.
As long as your head is covered to protect you from the sun, you should be ok a proper hat. I didn’t wear my baseball hat too often while others wore a scarf, visor or brimmed hat.
My memory for details isn’t the best so I wanted to make sure I wrote down what we did each day, aside from walk, in a journal before going to bed. Proof is in the pudding as I went to bed rather than journal the night before summit day and I couldn’t remember anything about what we did. Carrying a small pad of weatherproof paper might be a good way to remember the crazy phrases you come up with on the trail.
My tentmate brought a small spiky ball. When she showed it to me, I wish I has thought of that. It is such a good idea to foam roll sore or achy muscles. We didn’t have much room to use it though as the tent was the only dry place we had to lay down.
If you have a camera or will be listening to music along the way, definitely bring one a solar charger. There are not any plugs on the mountain. Get one with a power bank if you can in chase it is cloudy for a few days.
 |
| Massai women with the solar charger I donated to them. |
This will probably be controversial, but a pillow is something I would say is optional. My tentmate had an inflatable one while I brought a £1 travel neck pillow which wasn’t the best for actual sleeping. Sleep is key so if you are a light sleeper, think about what you will sleep on. Another option would be a pillowcase filled with clothes.
I spent £20 at my local Poundshop for various toiletries and supplies pictured below. Most were things my tour company recomended that I never would have though off (baby powder which I never used, dry shampoo (never used), throat losanges (never used), antiseptic creme (never used), ultra lite pads (as an option for not changing underwear on a daily basis), and ear plugs (never used)).

Skip
We made a quick stop at a convenience store before we started the drive to the gate. I was in the back corner of the van so didn’t go in. In the lead up to the climb, I had been mentally preparing myself not to have any Diet Coke for seven days. But when the other came back with Red Bull, I changed my mind. The lead guide was pretty upset when he found out we had Red Bull as caffiene can increase your heartrate which you don’t want to happen at altitude. We didn’t drink it on summit day but we did have it on the way down the mountain. I felt bad making the porters carry it the entire way and not drink it so we split it amongst the ladies.
If you have something to add to this list for buying, borrowing or leaving at home, please leave a comment below. Knowledge is power.
Before you go
I am fundraising for a Moshi local primary school and a Maasai tribe. Scroll to the bottom of my Kili summary post for more info on how to donate.
Items marked with a * were gifted to me to review. All opinions are honest and my own. Thanks to Osprey, Buff, Salomon, Decathlon, Ellis Brigham Mountain Sports, and Unilite for their generous support of my crazy adventure.
by thinkmarsh | May 8, 2018 | Kilimanjaro, outdoors, product review
Packing for Kilimanjaro was a process that took months. I did tons of research, checking packing lists by various trekking company’s suggestions, reading books, and talking to other people who have experienced Kilimanjaro. Of course, there was about one million things I needed to back into a 90L duffle bag so I thought I would let you know the things that I found useful to have. The girls on my trip also had a few tips on what they found useful.
If you think you will only use an item for this trip, your tour operator should be able to arrange hiring (renting) certain things. Be sure to ask the price before you get the item and keep in mind that what you hire may not be to your Western standard. It will probably be something that a toursit left or sold after their trip.
Essentials to pack
I used Osprey Eja 38*, a lightweight rucksack designed for a woman’s body. It was a little big for day-to-day climbing but perfect as a carry on as I needed to have all my essentials in case my bags got lost on the plane (two of the six in my group had luggage problems). The essential features were water pouch compatible, pockets on lid flap for storing things, hip and chest straps, and it only weight 1.13kg. It also had straps on outside to hold my walking sticks while climbing Baronco Wall. I also got an Osprey rain cover* kept my stuff dry. The only pockets were in the lid, which meant that I needed Osprey Ultralight Packing Cubes* to keep organised. I had one for my electronics, one for snacks, and another for toiletries. I t would have been helpful if each cube was a different color to make it easier to pull out of the Eja in a hurry. As an alternative, I tied a piece of colored ribbon on the zipper, which helped a bit.
My Camelpack pouch was essential. Having the tube and mouthpiece made it so much easier to drink on the go. I would say the thermal control kit is important too (although my tube froze on summit night anyways), along with a cap that keeps dirt out of the bite valve.
Hiking boots were a big concern for me. With Achilles tendinitis, I am very picky about what I wear on my feet. Salomon Quest 4D 3 GTX hiking boots* were something I knew I would need to keep my feet warm and dry. With heel lifts and loose laces, I was able to manage minimal Achilles pain. I only wore the Quest boots on summit day. The rest of the time, I wore my Salomon Womens Escambia GTX trail shoes which are a few seasons old. At times they were a little slippery but they kept my feet dry. Before I left, I treated them with Nikwax waterproofing to ensure my feet would stay dry.
Water purifying tablets were something I didn’t bring, but luckily someone else did. Although Eco-Climbing Africa’s team boil the water, my stomach was still funny. I have a pretty sensitive stomach no matter where in the world I am and some people experience problems at altitude too. Purifying tablets are light and inexpensive, so I say have them on hand just in case you or someone else needs them.
Gaitors and hiking poles were the two things that were on every list. The ones I used were Decathlon’s Forclaz 50*. I worn them every day and never got snow or rocks in my low top shoes. You can wear with shorts or long pants. And they were really helpful at keeping my long pants clean for inside tent too.
|
| Wearing my gaitors to keep the snow out of my shoes. I am also trying not to fall too. The snow was very slippery. |
As I just mentioned, adjustable hiking poles were the other key item to pack. A friend lent me their old Leki poles, similar to the Sherpa XL V. The adjustable heights are key as many days there is a gradient to manage, both up and down. By adjusting the height of the sticks, it makes ascending and descending much easier. Our guides were really good at setting the poles to the correct height.
Head torch is probably number three on my list. When we got back to camp, my head torch went straight into my pocket. Climbing in March meant early nights. After dinner, it would be pitch black.out and therefore hard to get back to our tents. The camp sites are uneven, full of rocks, and have tent poles and ropes everywhere. It would be a shame to get injured walking from one tent to another rather than make it to the top. Unilite sent me a Sport H1 head torch* to try. It offers 175 lumens, with 70m beam distance, red light, and various flashing patterns. We put fresh batteries in all of our head toches just before we started climbing to the summit and it lasted the rest of the trip.
I went to Kilimanjaro in March, which is close to the start of rainy season. My 25 liter dry bag was a bit of an overkill but a 5-10 liter bag for electronics and socks is a good idea. My duffel bag was a 90 liter dry bag too but the porters put it in another bag when they carried it. Their exterior bag was a bit worn through but this may depend on the company you travel with. Wet clean clothes and damp sleeping bags would really damper the trip, so try to find something that can resist some rain.
Hand sanitizer is a no brainer. There isn’t any water to wash your hands 95% of the time. Be prepared.
In addition to your Camelback, bring a water bottle that doesn’t leak to act as a hot water bottle. I mistakenly brought my Hydroflask, which is so well insulated that it didn’t keep me or my sleeping bag warm overnight. My tentmate was a godsend and lent me a plastic bottle to use at night. I owe her big time.
Every day, no matter how cloudy it was outside my tent, I put on sunscreen as we were very close to the equator. Don’t forget to apply it to your ears (I burned mine).
Pack several pairs of gloves in several different thicknesses. They will get wet so it is good to have a few alternatives. Although porters may not have gloves, I would suggest keeping your’s until the end of the trip. At the end of the trip, you can give any unwanted kit to the Kilimanjaro Porter’s Assistance Project. I picked up a few inexpensive pairs of gloves at Decathlon in the snow sports section that were great.
No matter what time of year, I would say a raincoat is an absolute must. Climbing to the top of Kili takes you through several exosystems. The weather on the mountain changes rapidly and you would hate to be caught out in a storm. I found a raincoat more helpful than the poncho got off Amazon because my poncho was long and I kept tripping on it while I was climbing. Look for a jacket with pit zips to help regulate your body temperature. I have needed a new raincoat for a while, so bought a Forclaz 400 from Decathlon. I bought a size bigger to allow for layering on the mountain.
Wet wipes are handy for a quick “shower” in the tent. Just be sure to get biodegradable ones and remember to pack some spare bags for your rubbish. Everything you carry into the parks, you have to carry out.. I didn’t use wipes much (other than armpits every morning) but my camp mates said they are a must.
Quick dry towel is really handy washing your face and hands at camp. You don’t have much time to leave it out to dry so a small size is the way to go. I packed my Life Adventure towel, which is also treated with Polygiene to reduce the smell between washes.
Your phone won’t be able to charge as there isn’t any electricity on the mountain, nor can it capture the beauty of the surrounding landscape. I brought my G-Eye900* active camera from Decathlon and meant to pack a small point and shoot but forgot it in the rush to get to the airport. You will need to consider the size and weight of the camera you pack. If you have a choice, invest in a camera that is drop proof and water proof. Or if you borrow one, learn how to use it before the trip.
I wore a scarf around my neck the while trip to help wipe sweat and snot away. Alice, from Alice’s Adventures on Earth, made us all of us some really cool ones with the trip logo on them. I also slept in my lighter Buff polar balaclava because I was so cold. My friend, Victoria, borrowed one of my balaclavas on summit day to stay warm. I started off with the Cross Tech buff but quickly took it off because I got warm.
This wasn’t on my essentials list, but everyone else in my group said handwarmers! I packed small ones that you can use while skiing while the girls brought body warmers. Mine didn’t keep me very warm but the others stuck them to their shirts during the day.
Optional
It rained so much that I couldn’t wear my Nabaiji pool clogs* at camp for fear of my feet getting wet. In addition, because I didn’t wear proper hiking boots on a daily basis, my feet weren’t too sore, tired, or heavy. The others in my group had camp shoes they wore in the evenings so you might want to pack a pair.
As long as your head is covered to protect you from the sun, you should be ok a proper hat. I didn’t wear my baseball hat too often while others wore a scarf, visor or brimmed hat.
My memory for details isn’t the best so I wanted to make sure I wrote down what we did each day, aside from walk, in a journal before going to bed. Proof is in the pudding as I went to bed rather than journal the night before summit day and I couldn’t remember anything about what we did. Carrying a small pad of weatherproof paper might be a good way to remember the crazy phrases you come up with on the trail.
My tentmate brought a small spiky ball. When she showed it to me, I wish I has thought of that. It is such a good idea to foam roll sore or achy muscles. We didn’t have much room to use it though as the tent was the only dry place we had to lay down.
If you have a camera or will be listening to music along the way, definitely bring one a solar charger. There are not any plugs on the mountain. Get one with a power bank if you can in chase it is cloudy for a few days.
|
| Massai women with the solar charger I donated to them. |
This will probably be controversial, but a pillow is something I would say is optional. My tentmate had an inflatable one while I brought a £1 travel neck pillow which wasn’t the best for actual sleeping. Sleep is key so if you are a light sleeper, think about what you will sleep on. Another option would be a pillowcase filled with clothes.
I spent £20 at my local Poundshop for various toiletries and supplies pictured below. Most were things my tour company recomended that I never would have though off (baby powder which I never used, dry shampoo (never used), throat losanges (never used), antiseptic creme (never used), ultra lite pads (as an option for not changing underwear on a daily basis), and ear plugs (never used)).
Skip
We made a quick stop at a convenience store before we started the drive to the gate. I was in the back corner of the van so didn’t go in. In the lead up to the climb, I had been mentally preparing myself not to have any Diet Coke for seven days. But when the other came back with Red Bull, I changed my mind. The lead guide was pretty upset when he found out we had Red Bull as caffiene can increase your heartrate which you don’t want to happen at altitude. We didn’t drink it on summit day but we did have it on the way down the mountain. I felt bad making the porters carry it the entire way and not drink it so we split it amongst the ladies.
If you have something to add to this list for buying, borrowing or leaving at home, please leave a comment below. Knowledge is power.
Before you go
I am fundraising for a Moshi local primary school and a Maasai tribe. Scroll to the bottom of my Kili summary post for more info on how to donate.
Items marked with a * were gifted to me to review. All opinions are honest and my own. Thanks to Osprey, Buff, Salomon, Decathlon, Ellis Brigham Mountain Sports, and Unilite for their generous support of my crazy adventure.

by Mollie Millington | May 2, 2018 | product review, running, technology
A few weeks ago, dorsaVi got in touch and offered me a chance to have my running form analysed. Having had a gait analysis done before, I was keen to see what this process would offer me in terms of information (and of course, if I am any better at running now after having started corrective exercise training).
The only place in London to offer this service is the Bowskill Clinic near Baker Street/Oxford Street tube station. The team there welcomed me warmly, even though I was a sweaty mess and 10 minutes late (I seriously need a proper compass). I met Rachel and Jon, who kindly brought me up to one of the posh exam rooms and explained the technology to me. In simplest terms, the ViMove2 are two little sensors that are taped to your tibia on each leg.
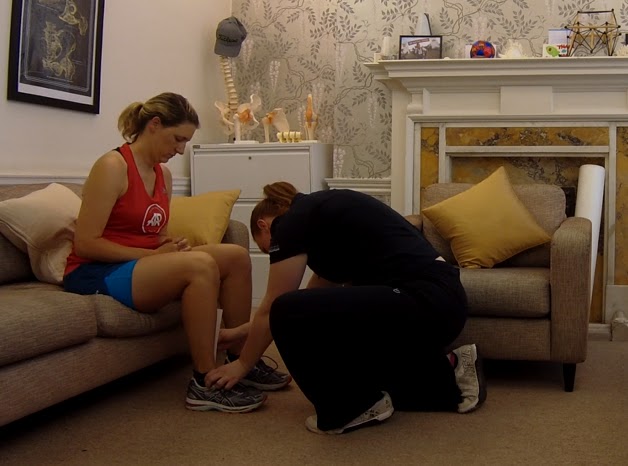 |
| Rachel taking measurements to ensure the sensors were positioned properly. |
This wearable technology monitors your motion and muscle activity in real time. Originally, the clinic used dorsaVi sensors for patients with back injuries. Clients would be sent home with the sensors attached for 24 hours and then return for the data upload and report. The ViMove2, however, is for analyzing knee movements. These can also be worn home for a long period of time but with a short assessment you can still obtain a lot of information.
After my online profile was created and the sensors attached, the testing phase of my appointment lasted about 15 minutes. First, I had to perform squats. Each movement I did three or four times to provide an average score. Next, I had to squat on just my left leg, then just the right. Finally, I had to hop on each foot. We then headed outside for a three minute jog in a nearby park. It was really sunny and warm on the day of my appointment so I got a bit sweaty.
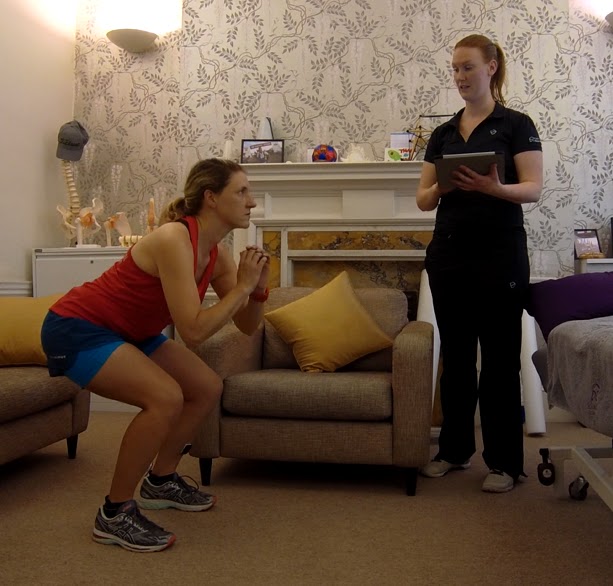 |
| I am taking this test very seriously. |
I am happy to say the sensors stayed in place with the adhesive tape used. I could barely notice they were there so I don’t think my running form was comprised at all. By running for at least three minutes, the data collected can look at my running rhythm and stride patterns over time.
 |
| Just before my run. I had shorts on, I swear! |
After all the info is downloaded to the software, a large report is generated. By taking measurements of the angle off of the centre (your neutral position), it can let you know how symmetrical your legs are, if your legs rotate in or out when you move (which could lead to pain or injury). The tibial inclination (TI) is the maximum angle that the tibia tilt forward while your foot is on the ground. A TI of less than 20 can indicate poor ankle movement and/or reduced leg strength. I am not yet at 20, but pretty close. My right Achilles was bothering me this day, to the point that even Jon noticed the difference in my left and right leg jumps just by observing how high I jumped.
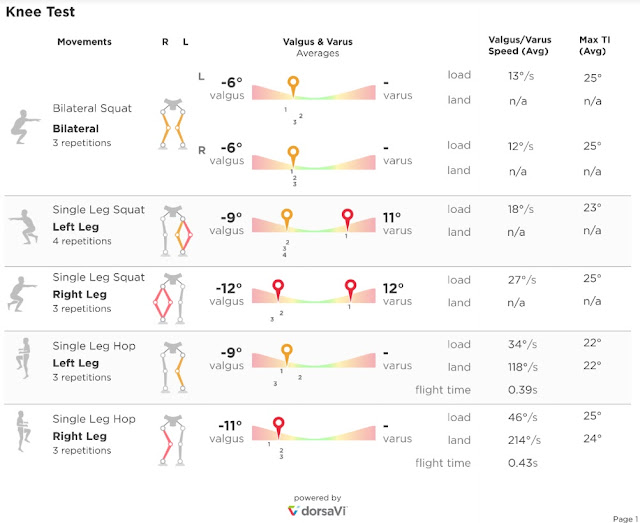 |
| Valgus and varus details for each test |
Overall, my angles (varus and valgus) are a bit more extreme that the average person. Anything grater than +10 or -10 indicates a higher risk of injury. I am symmetrical however, so both legs move in similar patterns.
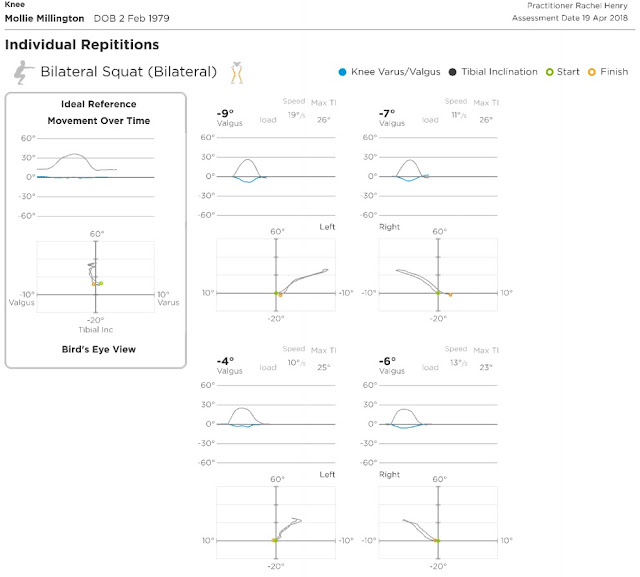 |
| Information is also shown in 2D. This is for two repetitions of a squat. |
The data collected during the run also tells you your ground contact time, initial peak acceleration, and ground force reaction. Using this info, along with other baseline tests, sports therapists and trainers can develop a training program to correct any issues. At a later date, you can then re-test and see if there have been improvements. Here is some of my data:
- Ground contact time was high, indicating low cadence and possible fatigue.
- Initial peak acceleration was average.
- Ground force reaction was very low, which may indicate run efficiency.
- My cadence was 173/min at a 12 km/hour pace.
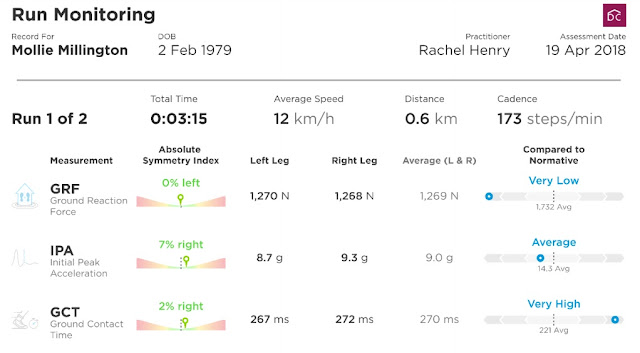 |
| Data from my three minute run |
As a biologist-by-training, I much prefer data-driven evidence. It makes more sense to me and can be confidently monitored over time. Even having something as simple as photographs or videos of your form can be a powerful tool. I look forward to seeing how wearable technology makes it easier for athletes, either professionals or amateurs, to improve their performance. The ViMove2 was a very simple physical performance-based test, non-invasive, and provided a lot of information. If you are looking to improve your run form, see how your body moves in different kit (such as shoes), or want to learn more about how your body moves, I highly recommend finding a local provider who offers ViMove2 sessions.
Thanks to the Bowskill Clinic and dorsiVi for the complimentary experience in trying out this movement monitoring system. All opinions are honest and my own. The crappy running form too.
by thinkmarsh | May 2, 2018 | product review, running, technology
A few weeks ago, dorsaVi got in touch and offered me a chance to have my running form analysed. Having had a gait analysis done before, I was keen to see what this process would offer me in terms of information (and of course, if I am any better at running now after having started corrective exercise training).
The only place in London to offer this service is the Bowskill Clinic near Baker Street/Oxford Street tube station. The team there welcomed me warmly, even though I was a sweaty mess and 10 minutes late (I seriously need a proper compass). I met Rachel and Jon, who kindly brought me up to one of the posh exam rooms and explained the technology to me. In simplest terms, the ViMove2 are two little sensors that are taped to your tibia on each leg.
|
| Rachel taking measurements to ensure the sensors were positioned properly. |
This wearable technology monitors your motion and muscle activity in real time. Originally, the clinic used dorsaVi sensors for patients with back injuries. Clients would be sent home with the sensors attached for 24 hours and then return for the data upload and report. The ViMove2, however, is for analyzing knee movements. These can also be worn home for a long period of time but with a short assessment you can still obtain a lot of information.
After my online profile was created and the sensors attached, the testing phase of my appointment lasted about 15 minutes. First, I had to perform squats. Each movement I did three or four times to provide an average score. Next, I had to squat on just my left leg, then just the right. Finally, I had to hop on each foot. We then headed outside for a three minute jog in a nearby park. It was really sunny and warm on the day of my appointment so I got a bit sweaty.
|
| I am taking this test very seriously. |
I am happy to say the sensors stayed in place with the adhesive tape used. I could barely notice they were there so I don’t think my running form was comprised at all. By running for at least three minutes, the data collected can look at my running rhythm and stride patterns over time.
|
| Just before my run. I had shorts on, I swear! |
After all the info is downloaded to the software, a large report is generated. By taking measurements of the angle off of the centre (your neutral position), it can let you know how symmetrical your legs are, if your legs rotate in or out when you move (which could lead to pain or injury). The tibial inclination (TI) is the maximum angle that the tibia tilt forward while your foot is on the ground. A TI of less than 20 can indicate poor ankle movement and/or reduced leg strength. I am not yet at 20, but pretty close. My right Achilles was bothering me this day, to the point that even Jon noticed the difference in my left and right leg jumps just by observing how high I jumped.
|
| Valgus and varus details for each test |
Overall, my angles (varus and valgus) are a bit more extreme that the average person. Anything grater than +10 or -10 indicates a higher risk of injury. I am symmetrical however, so both legs move in similar patterns.
|
| Information is also shown in 2D. This is for two repetitions of a squat. |
The data collected during the run also tells you your ground contact time, initial peak acceleration, and ground force reaction. Using this info, along with other baseline tests, sports therapists and trainers can develop a training program to correct any issues. At a later date, you can then re-test and see if there have been improvements. Here is some of my data:
- Ground contact time was high, indicating low cadence and possible fatigue.
- Initial peak acceleration was average.
- Ground force reaction was very low, which may indicate run efficiency.
- My cadence was 173/min at a 12 km/hour pace.
|
| Data from my three minute run |
As a biologist-by-training, I much prefer data-driven evidence. It makes more sense to me and can be confidently monitored over time. Even having something as simple as photographs or videos of your form can be a powerful tool. I look forward to seeing how wearable technology makes it easier for athletes, either professionals or amateurs, to improve their performance. The ViMove2 was a very simple physical performance-based test, non-invasive, and provided a lot of information. If you are looking to improve your run form, see how your body moves in different kit (such as shoes), or want to learn more about how your body moves, I highly recommend finding a local provider who offers ViMove2 sessions.
Thanks to the Bowskill Clinic and dorsiVi for the complimentary experience in trying out this movement monitoring system. All opinions are honest and my own. The crappy running form too.


Recent Comments